Invalid Signature. Code failed to satisfy specified code requirement(s). The file at path "xxx/Frameworks/libswiftAVFoundation.dylib" is not properly signed.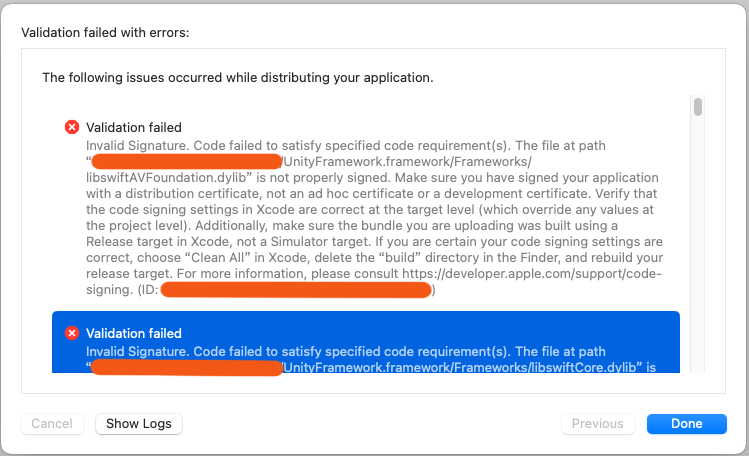
这是一个很诡异的BUG, 因为我在2026年2月份的时候用同样的XCode版本+Unity版本成功上传了一个包体到AppStore Connect, 然后到了2026年6月份的时候,执行相同的操作,然而却报错了。遇到该问题后,尝试过:清理原来的构建历史,重新构建;升级xcode版本;均失败了。
咨询 Claude,它给出的解决方式为 手动删除 AVFoundation.framework, 然后再手动添加 AVFoundation.framework。采用这种方式,成功完成验证了。
我没有止步于Claude 给出的解决方案,我用AI写了一段简单的python脚本去分析 ContentDelivery.log 出错日志文件,找出那些有出错的 .framework 或者 .dylib 文件。
对应的python 源代码如下:
import re
import os

def analyze_dylib_name(filename):
    """
    分析 dylib 文件名并映射到对应的 framework 或保留原名
    """
    # 预定义属于 Swift 基础运行时和底层 C/Objc 桥接的库
    swift_runtime_libs = {
        "Core",
        "Darwin",
        "Dispatch",
        "ObjectiveC",
        "_Concurrency"
    }

    # 检查是否为标准的 libswift 动态库命名规则
    if filename.startswith("libswift") and filename.endswith(".dylib"):
        # 提取中间的核心名称,例如 libswiftAVFoundation.dylib -> AVFoundation
        base_name = filename[8:-6] # len("libswift")=8, len(".dylib")=6

        # 如果是核心运行时库,按要求保留原名
        if base_name in swift_runtime_libs:
            return filename
        # 否则认为是系统 Framework 的桥接库,加上 .framework
        else:
            return f"{base_name}.framework"

    return filename

def extract_and_analyze_paths(input_file, output_file):
    # 检查输入文件是否存在
    if not os.path.exists(input_file):
        print(f"错误: 找不到文件 '{input_file}'")
        return

    # 正则表达式匹配规则
    pattern = r'The file at path “(.*?)” is not properly signed\.'

    try:
        # 以 utf-8 编码读取日志
        with open(input_file, 'r', encoding='utf-8') as f:
            log_content = f.read()

        # 提取并利用 set 进行去重
        extracted_paths = set(re.findall(pattern, log_content))

        if not extracted_paths:
            print("未在日志中找到符合条件的未签名文件路径。")
            return

        # 创建一个列表,用来存储 (映射后的名字, 原始路径) 的组合
        processed_items = []
        for path in extracted_paths:
            filename = os.path.basename(path)
            mapped_name = analyze_dylib_name(filename)
            processed_items.append((mapped_name, path))

        # 按照映射后的名字 (mapped_name) 进行字母排序
        # 使用 .lower() 忽略大小写,使其行为与 Xcode 的排序规则完全一致
        processed_items.sort(key=lambda item: item[0].lower())

        # 写入并格式化输出文件
        with open(output_file, 'w', encoding='utf-8') as f:
            # 遍历排序好的列表
            for index, (mapped_name, path) in enumerate(processed_items, start=1):
                # 按照要求的格式拼接: 1) path => mapped_name
                line = f"{index}) {path} => {mapped_name}\n"
                f.write(line)

        print(f"成功!共提取并分析了 {len(processed_items)} 个文件路径。")
        print(f"结果已按 Framework 字母顺序排序,并保存至: {output_file}")

    except Exception as e:
        print(f"发生错误: {e}")

if __name__ == "__main__":
    # 输入的日志文件名
    INPUT_LOG_FILE = "ContentDelivery.log"
    # 输出的日志文件名
    OUTPUT_LOG_FILE = "analyzed_files_log.txt"

extract_and_analyze_paths(INPUT_LOG_FILE, OUTPUT_LOG_FILE)执行这段python脚本,得到了以下输出内容:
1) Frameworks/libswiftAVFoundation.dylib => AVFoundation.framework
2) Frameworks/libswiftCoreAudio.dylib => CoreAudio.framework
3) Frameworks/libswiftCoreFoundation.dylib => CoreFoundation.framework
4) Frameworks/libswiftCoreGraphics.dylib => CoreGraphics.framework
5) Frameworks/libswiftCoreImage.dylib => CoreImage.framework
6) Frameworks/libswiftCoreLocation.dylib => CoreLocation.framework
7) Frameworks/libswiftCoreMedia.dylib => CoreMedia.framework
8) Frameworks/libswiftFoundation.dylib => Foundation.framework
9) Frameworks/libswift_Concurrency.dylib => libswift_Concurrency.dylib
10) Frameworks/libswiftCore.dylib => libswiftCore.dylib
11) Frameworks/libswiftDarwin.dylib => libswiftDarwin.dylib
12) Frameworks/libswiftDispatch.dylib => libswiftDispatch.dylib
13) Frameworks/libswiftObjectiveC.dylib => libswiftObjectiveC.dylib
14) Frameworks/libswiftMetal.dylib => Metal.framework
15) Frameworks/libswiftNetwork.dylib => Network.framework
16) Frameworks/libswiftos.dylib => os.framework
17) Frameworks/libswiftQuartzCore.dylib => QuartzCore.framework
18) Frameworks/libswiftsimd.dylib => simd.framework
19) Frameworks/libswiftUIKit.dylib => UIKit.framework
根据这个文件列表,搜索 project.pbxproj 文件,看看上面列出的 .framework 库文件是否都有链接。从这里确实找到了几个 .framework 库文件未被引用,为此修改 unity c# ios 导出脚本,添加这几个缺少的库文件,对应的C#脚本如下:
    static void EditProj(string pathToBuiltProject)
    {
#if UNITY_IOS || UNITY_IPHONE
        string projPath = PBXProject.GetPBXProjectPath(pathToBuiltProject);

        PBXProject pbxProject = new PBXProject();
        pbxProject.ReadFromFile(projPath);

        string frameworkTargetGuid = pbxProject.GetUnityFrameworkTargetGuid();

        pbxProject.AddFrameworkToProject(frameworkTargetGuid, "CoreAudio.framework", true);
        pbxProject.AddFrameworkToProject(frameworkTargetGuid, "CoreFoundation.framework", true);
        pbxProject.AddFrameworkToProject(frameworkTargetGuid, "CoreImage.framework", true);
        pbxProject.AddFrameworkToProject(frameworkTargetGuid, "Network.framework", true);

        pbxProject.WriteToFile(projPath);
#endif
}命令行下执行 pod install 后,用xcode打开项目,然后手动删除/添加 Foundation.framework后,构建打包,验证成功,之后成功上传包体。